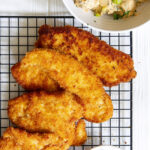


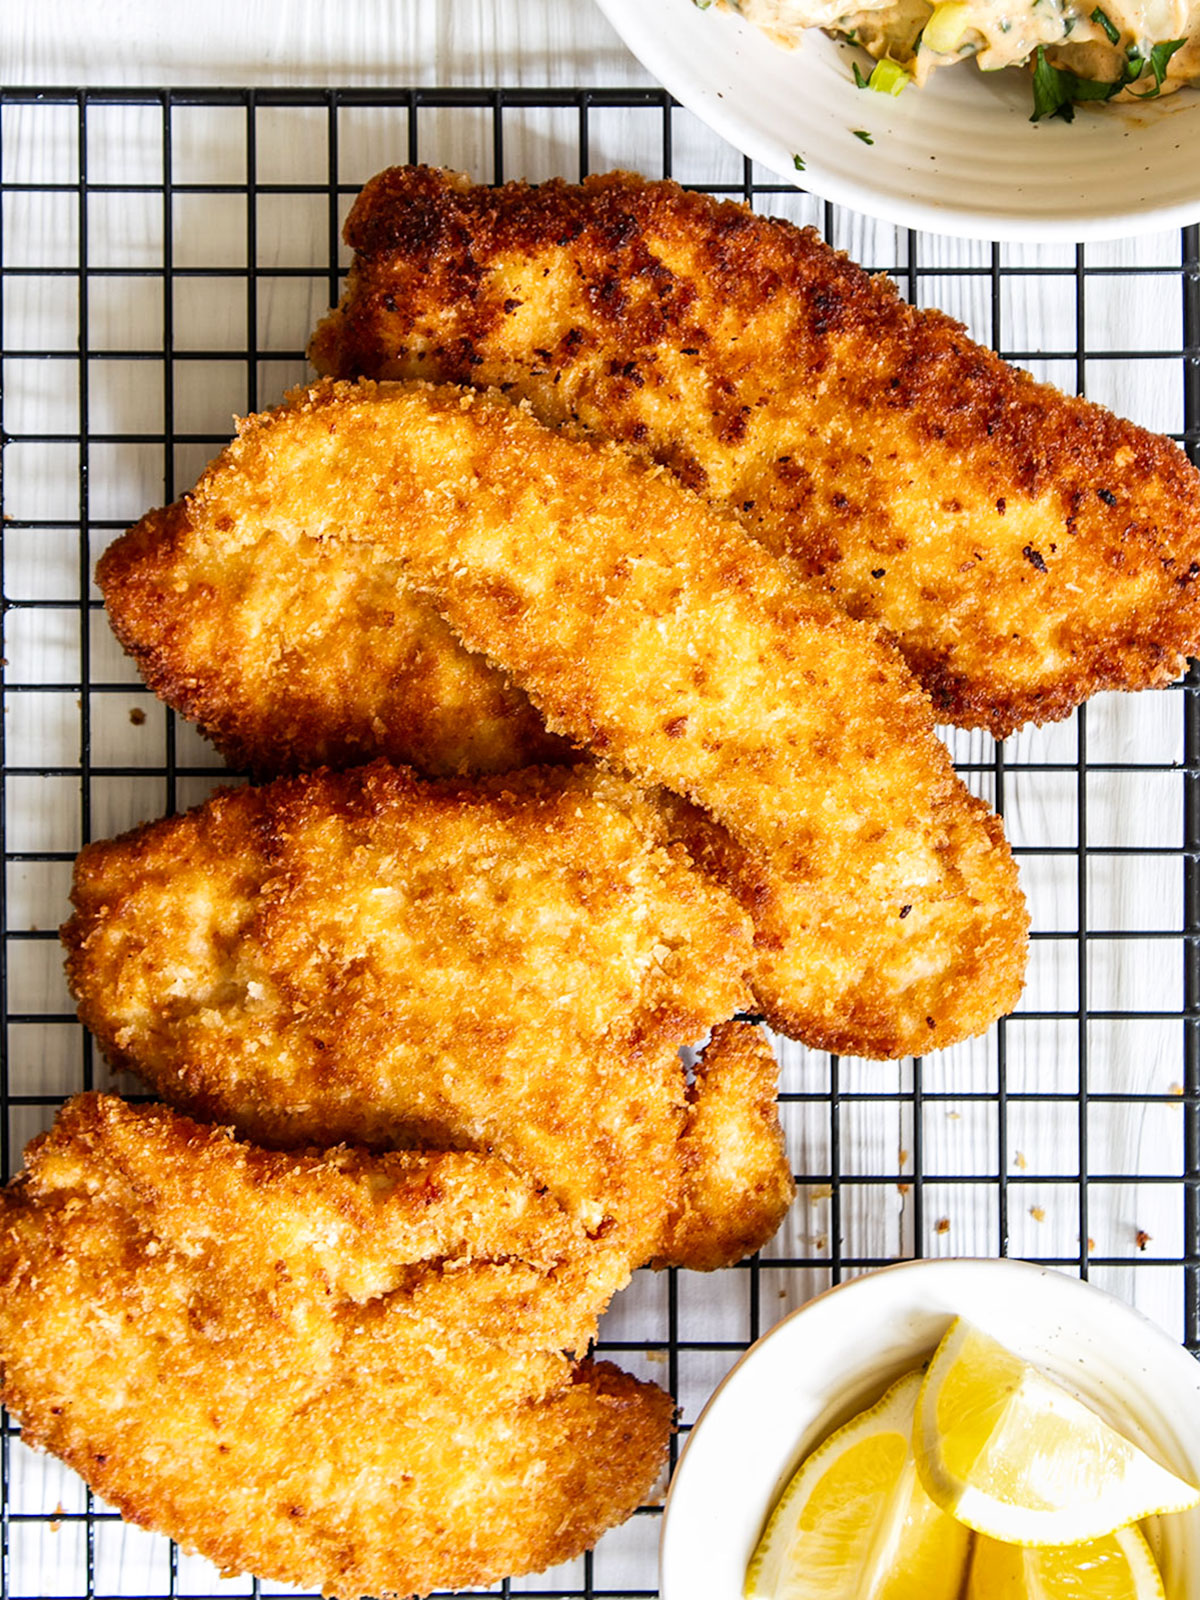
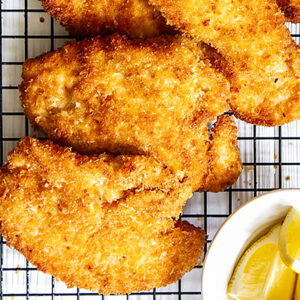
Make tender, crispy, and seriously tasty panko chicken in just 20 minutes. This recipe will give you all the tips and information you need to get the perfect breaded chicken breasts on your first try.
Learn how to get the chicken super tender, season the flour to get a superbly flavorful crust, and pan-fry (or bake) to crispy perfection.
I made this tonight and it was absolutely crispy and delicious. Your recipe and directions were clear and precise and that’s why they turned out so amazingly!
When it comes to cooking the chicken, I tested shallow frying and baking, and while pan-frying wins for crispiness, baking is a good choice if you're looking for a lighter option. Both methods are included in this recipe, so you can choose what works for you.
This is sure to become one of your go-to chicken recipes, along with Harissa Chicken and Baked Creamy Chicken Orzo. Plus with so many serving options it never gets boring. Creamy White Wine Pasta and Arugula Salad are among my favorties.
Adding that irresistible crunch to your dishes is a breeze with panko breadcrumbs. Why not try this Panko Crusted Cod with Parmesan or Panko Pesto Salmon next?
The post contains additional information and helpful tips to ensure the recipe turns out great the first time. Please use the link above to jump to the recipe card at the end if you are in a hurry!
Why you'll love this recipe:
- Super tender chicken. Many recipes suggest just butterflying the chicken, but I also tenderize it with a meat mallet (or other heavy object).
- The crispiest chicken. Packed with tips to help you fry it to golden, crispy perfection.
- The tastiest crust. With a mix of seasonings like paprika, garlic powder, onion powder, and mustard powder.
Ingredients:

- Chicken - you can use breast, tenders, or boneless skinless chicken thighs. I always opt for breast and tenders will work too if you prefer small pieces of panko chicken. Frying adds fat, so I like to start with a lean cut of meat.
- Panko breadcrumbs - these should be available in your local store. You can also use regular breadcrumbs but the chicken won't be as crispy.
- Seasoning - I go to town when it comes to seasoning the flour. This results in a panko coating that's popping with flavor as well as perfectly crispy. I add paprika, cayenne pepper, garlic powder, onion powder, mustard powder, white pepper and salt. If you don't have all of these, don't let it stop you, you'll still get a tasty panko crust.
- Oil - Use a neutral oil with a high burn point like vegetable, sunflower oil, or canola oil. Olive oil is not suitable for frying.
Variations:
Note that the recipe has not been tested with all the substitutions and variations below, so the results cannot be guaranteed.
- Parmesan panko chicken - made by adding ¼ cup of grated parmesan cheese to the panko crumbs.
- Herby panko chicken - add a couple of teaspoons or dried herbs to the panko crumbs like sage, thyme or Italian seasoning.
- Lemon pepper panko chicken - add lemon pepper seasoning to the flour or lemon zest to the panko bread crumbs and black pepper to the flour.
Recipe steps
*Be sure to see the recipe card below for the full ingredients list & instructions! *
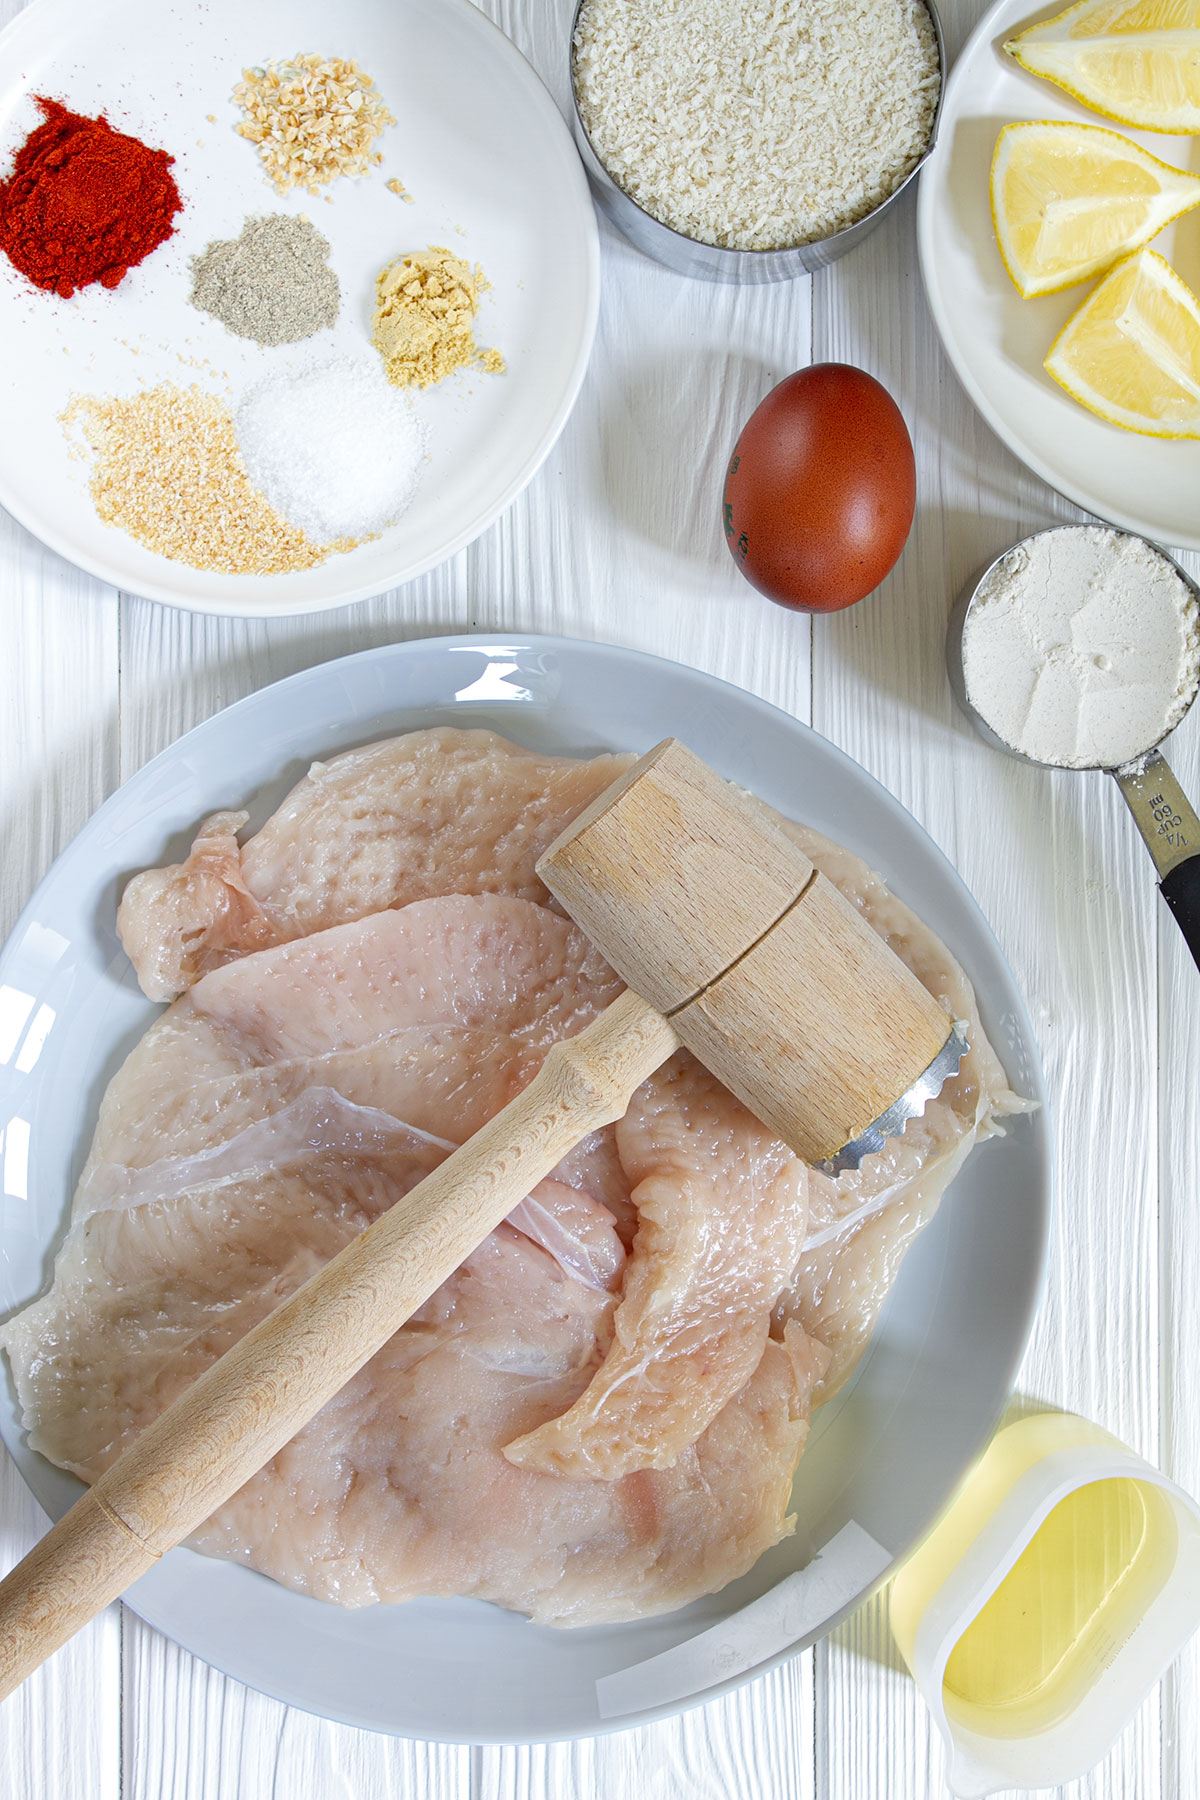
Step 1: Tenderize the chicken: Place the chicken breasts on a cutting board and use a sharp knife to cut them horizontally into cutlets. Then pound them with a meat tenderizer or other heavy object like a rolling pin.
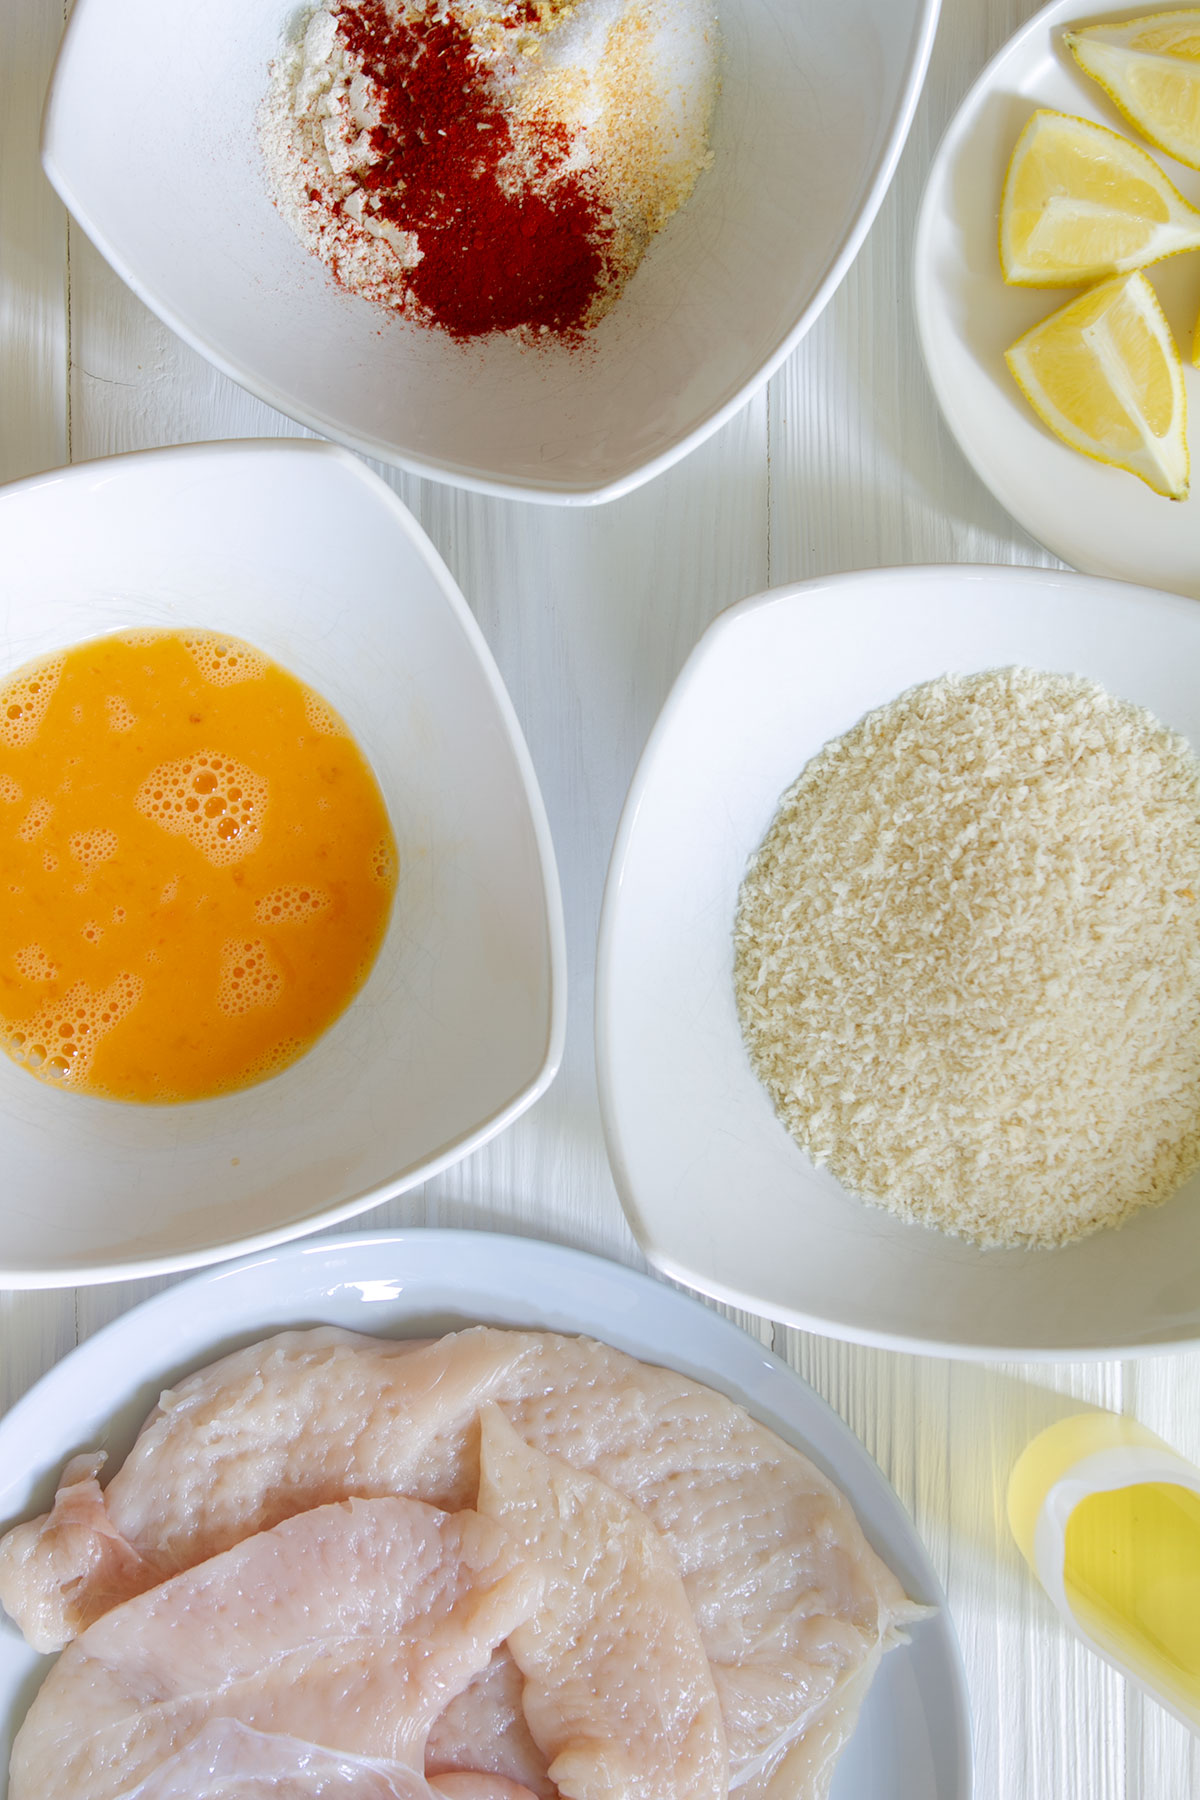
Step 2: Prepare the flour, egg wash, and panko breadcrumbs. Mix the flour, paprika, onion powder, garlic powder, mustard powder, white pepper, and salt in a shallow bowl. Crack the egg into another bowl and beat. Then place the panko breadcrumbs in a third bowl.
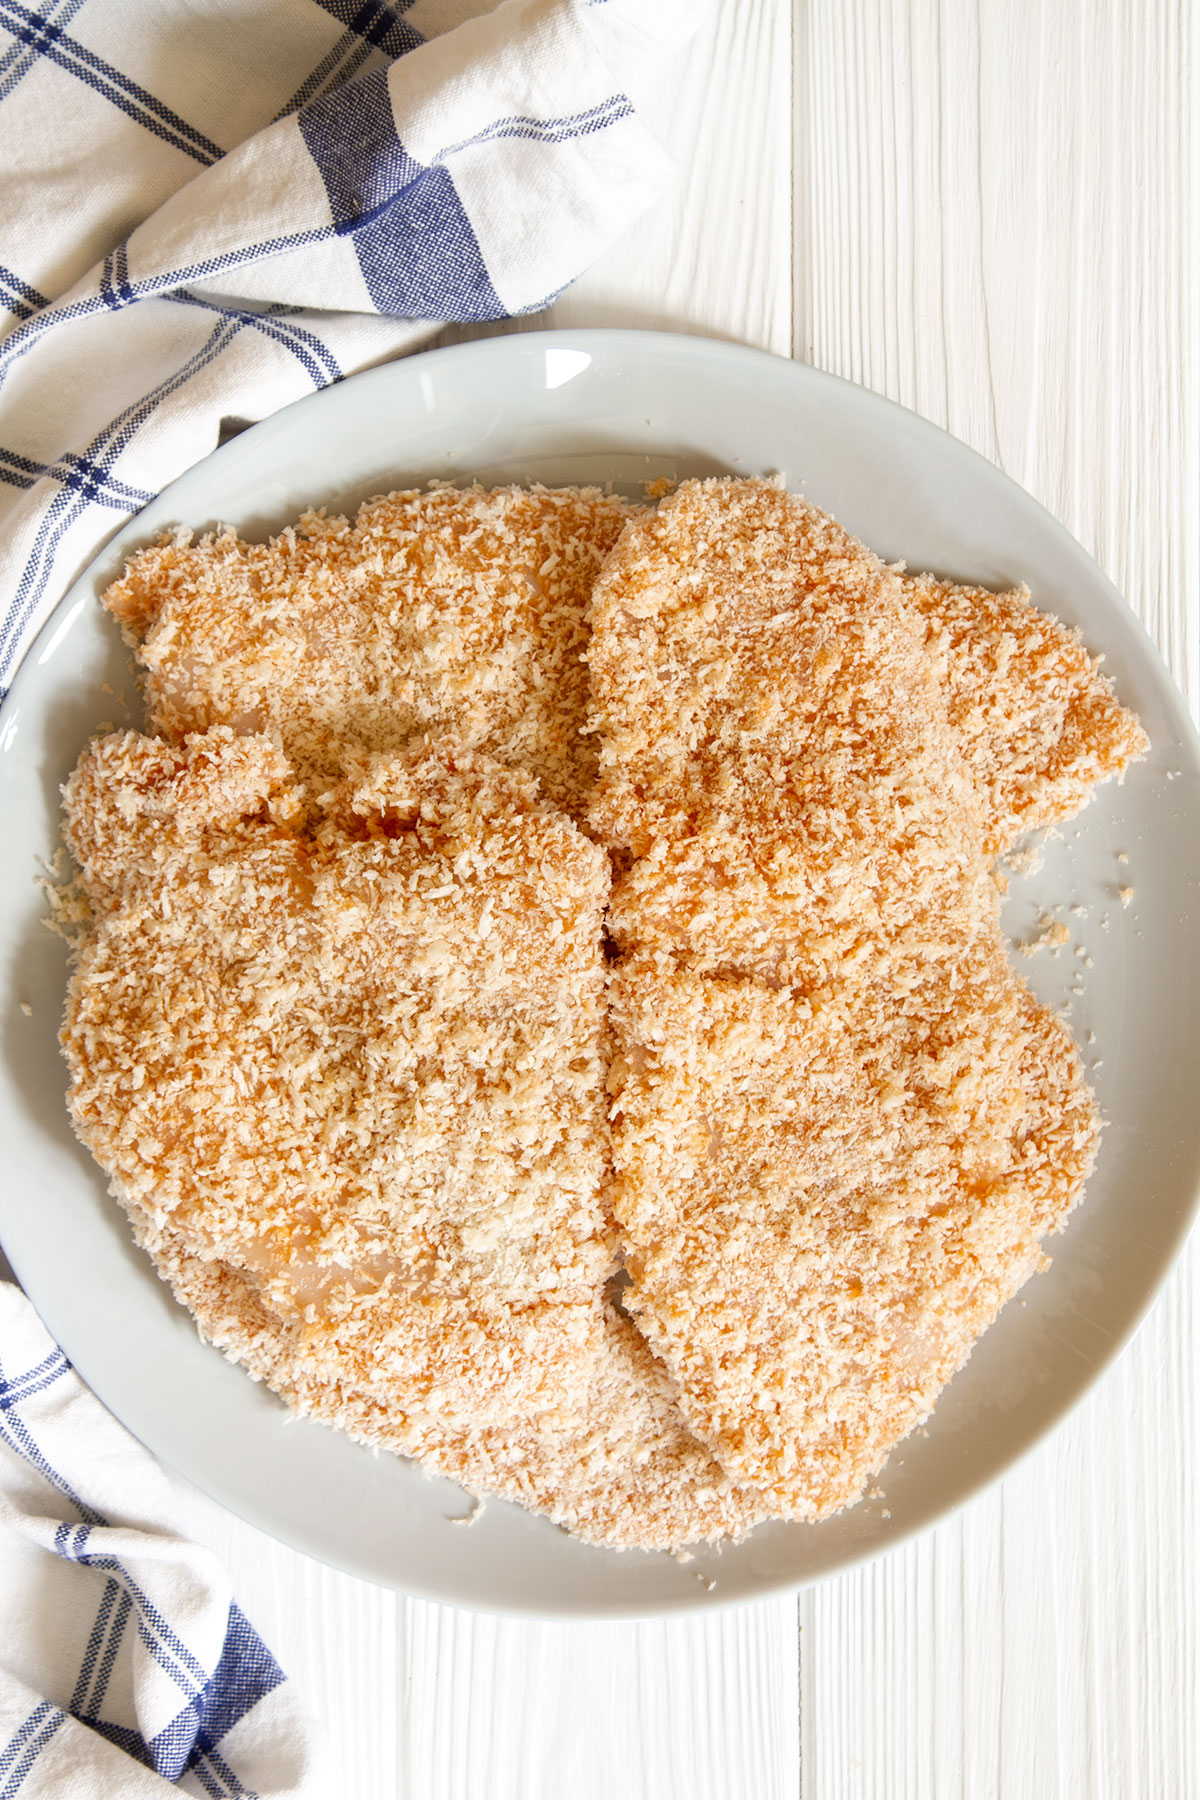
Step 3: Coat the chicken cutlets. Place each piece of chicken into the flour mixture until coated, then dunk them in the beaten egg and finally place them in the panko breadcrumbs until they are covered.
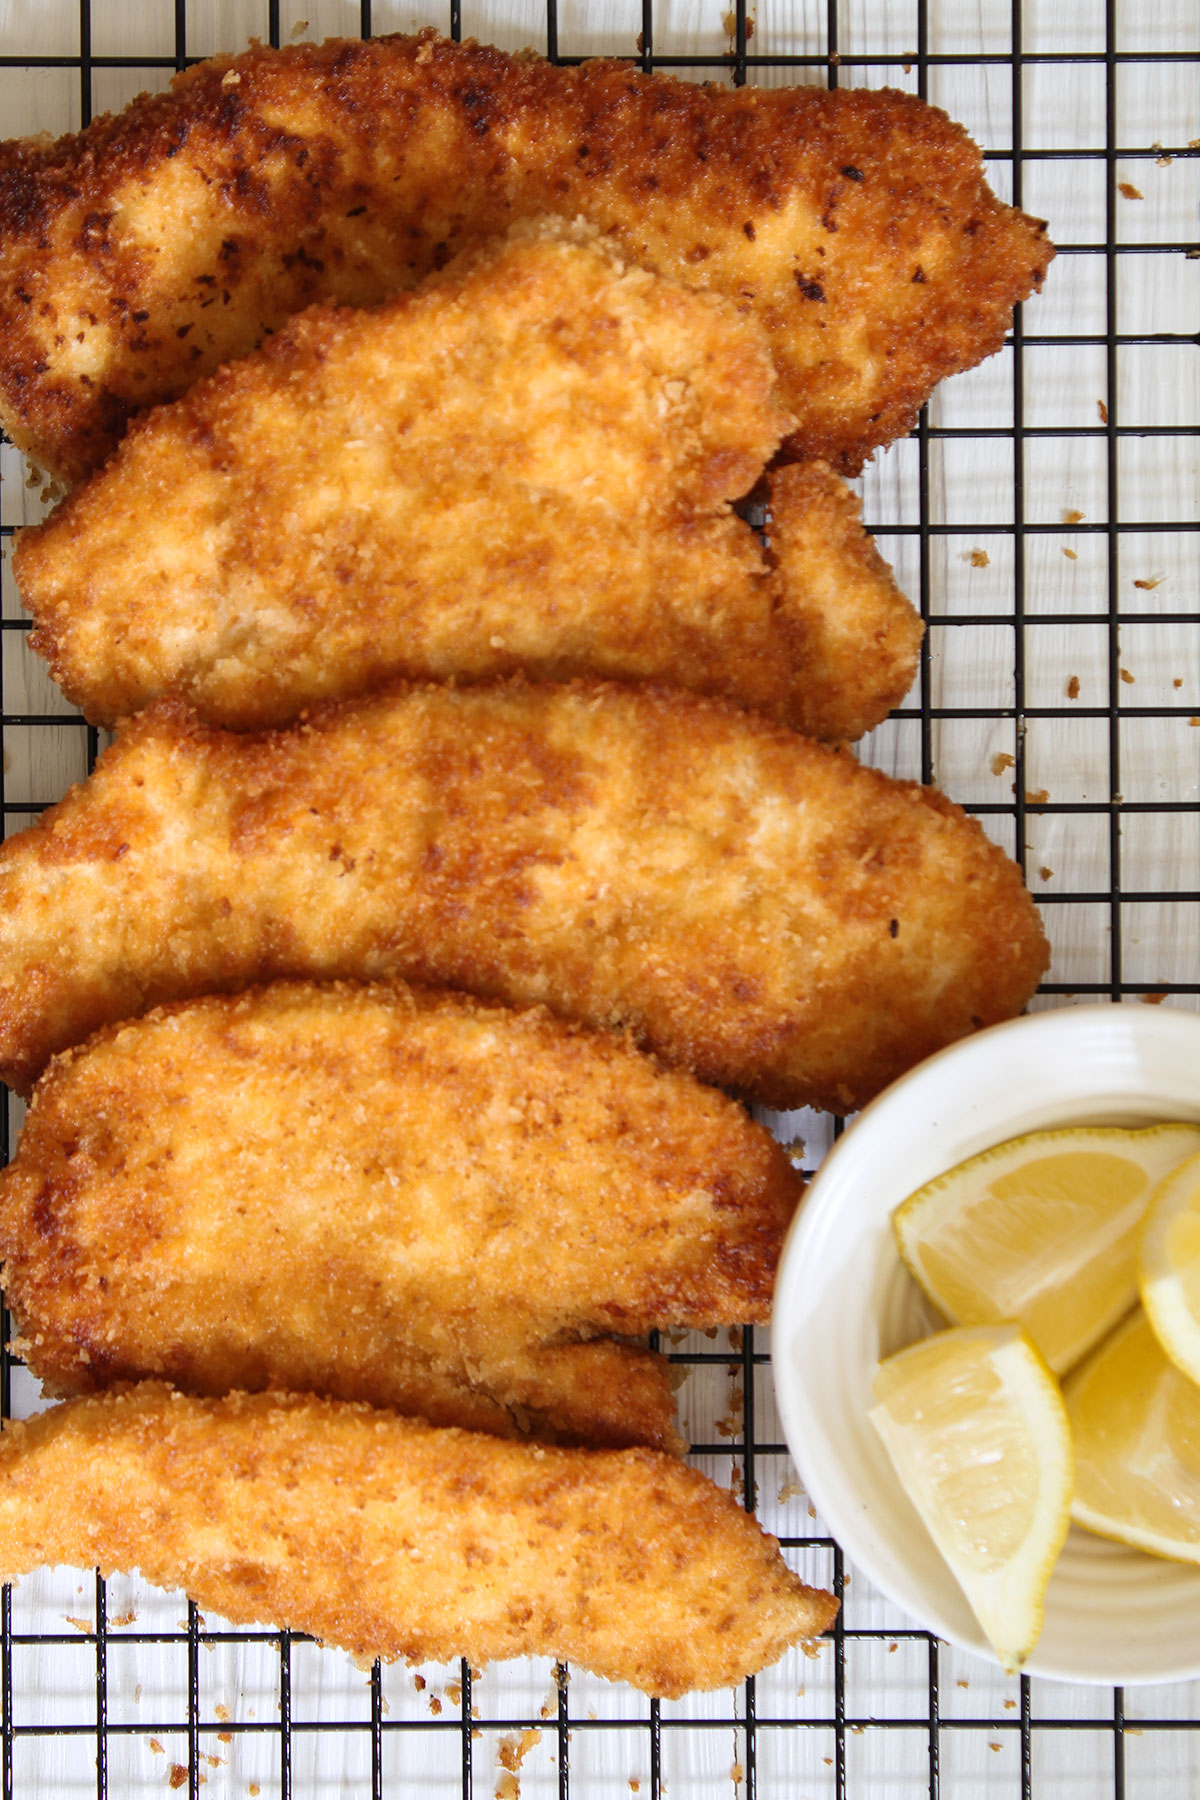
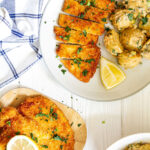
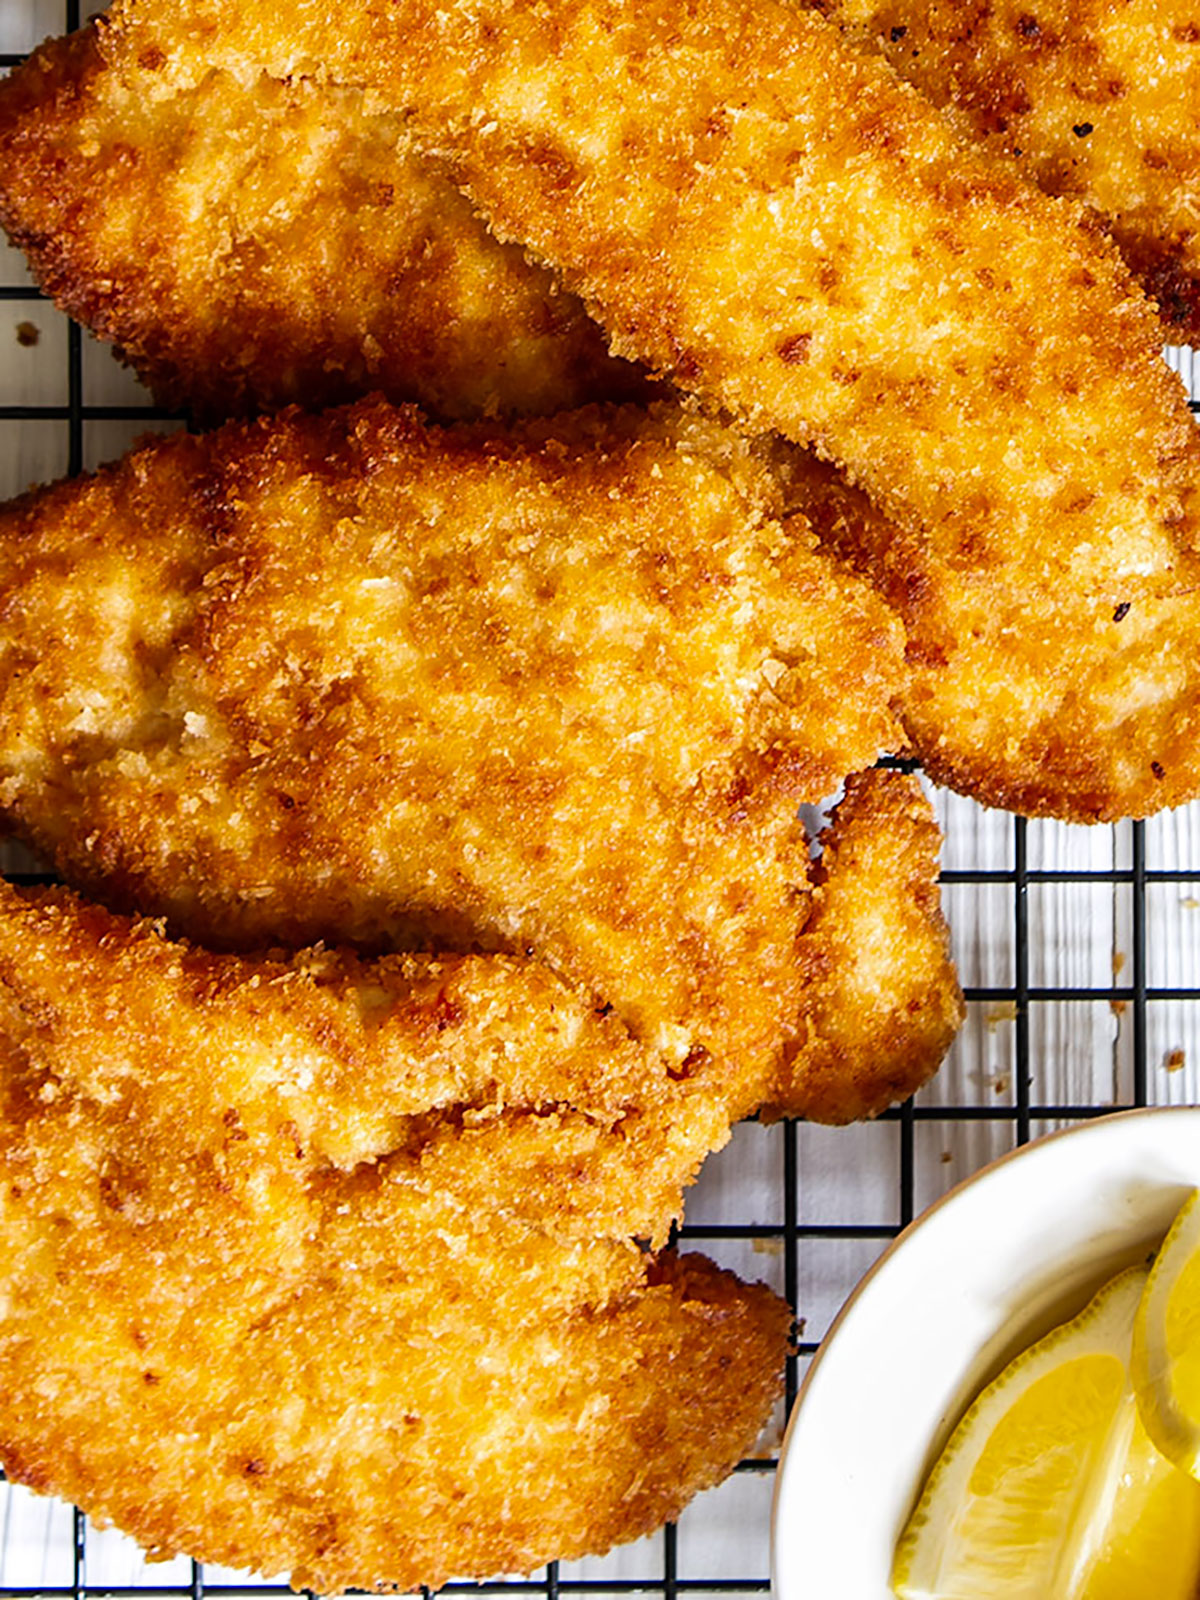
Step 4: Pan fry or bake and serve immediately with lemon wedges and your choice of sides.
How to pan-fry the chicken
Place a large skillet over a medium-high heat and fill with ¼ inch of cooking oil. When the oil is hot place the panko-coated chicken breasts into the pan and fry for 1.5 to 2 minutes on each side until golden brown. Transfer panko chicken to a wooden board or a wire rack and let it rest for a few minutes.
Baking method
To ensure both sides of the chicken stay crispy, place the chicken breasts on a wire rack over a baking sheet. Bake in a preheated 400°F (200°C) oven for 12-15 minutes or until internal temperature reaches 165°F (74°C).
Allow chicken breasts to rest on a cooling rack for 2-3 minutes before cutting. You'll get a slightly less crispy crust than pan-frying, but the chicken taste will be just as flavorful.
Expert tips
- Tenderize the chicken. Pounding the raw chicken breasts with a meat mallet or other heavy object like a rolling pin breaks down the fibers and results in a faster cooking time and keeps the moisture locked in. Before you do this, pat the chicken dry with paper towels or cover the chicken with plastic wrap to prevent the juices from splashing.
- Make sure the oil is hot before you fry the chicken. You need the oil to be hot around 350° Fahrenheit (180°Celsius) to get panko chicken deliciously crispy. It's best to drop one panko crumb into the pan to test the oil. If the oil is hot enough the crumb will sizzle up. If the crumb sinks, then you need to wait a little longer.
- Use tongs to cook the chicken. They let you handle the chicken safely while you fry it.
Serving suggestions:
There are so many ways to enjoy panko chicken. Whether you're looking for a light or a hearty meal there are lots of sides and sauces to try.
- Enjoy it in a sandwich like this Chicken Ciabatta with Creamy Pesto.
- Salad. Serve with a simple green salad, red-skin potato salad, or pasta salad.
- Potatoes. Baked potatoes, fried potatoes, wedges, and sweet potato fries all work well.
- Vegetables. Roasted corn, aubergine/eggplant, zucchini/courgette, and more.
- Sauces add moisture and flavor to delicious crispy panko chicken, but if you prefer to keep things simple a squeeze of lemon juice goes well too. Katsu curry sauce, Tomato Meatball Sauce, and lemon cream sauce are among my favorites.
FAQs
Panko breadcrumbs are made from dried flakes of crustless white bread. They are lighter and crispier than regular breadcrumbs because they are dryer and flakier and absorb less oil during the cooking process. That said you can use regular breadcrumbs too. The chicken breasts just may not be as crispy.
Chicken is cooked when the panko crust is crisp and golden and the inside is white and opaque. You can use an instant-read thermometer to check that the internal temperature of the chicken has reached 165 degrees F (75 degrees C) or by cutting into the thickest part of one of the chicken breasts.
Storage
Panko chicken will stay good in the fridge for up to 3 days. Just let it cool, put it in an airtight container, or cover it with plastic wrap.
To reheat, bake for 10-15 minutes at 400°F (200°C) or air fry at 375°F (190°C) for 4 minutes.
You can freeze panko chicken for up to 3 months. Just spread your cooked pieces on a baking sheet or plate lined with parchment paper in a single layer with some space in between. Place them in the freezer for an hour, then put them into a freezer bag once frozen. You can bake the chicken from frozen or thaw first, overnight in the fridge.
Video tutorial
More chicken recipes >>
Did you try this recipe?
It would be really great if you could leave a comment and a star rating ⭐️. I would love to receive your feedback and know that other readers find it helpful too.
Don't forget to tag #knifeandsoulrecipes on Instagram or @knifeandsoul on Pinterest!
Recipe Card
Super Crispy Panko Chicken (Fried or Baked)
Equipment
- frying pan
- Chopping board
- Meat tenderizer
Ingredients
- 2 chicken breasts (Note 1)
- ¼ cup (30 g) all-purpose flour
- 1 teaspoon smoked paprika
- ¼ teaspoon onion powder
- ¼ teaspoon garlic powder
- ¼ teaspoon mustard powder
- ¼ teaspoon white pepper
- 1 teaspoon sea or kosher salt
- 1 egg
- 1 cup (60 g) panko breadcrumbs (Note 2)
- (⅔ cup) vegetable or other neutral oil. To fill a frying pan with ¼ inch (0.5cm).(Note 3)
- Lemon wedges to serve
Instructions
Preparing the chicken
- Prepare the chicken breasts. Remove any fat from the chicken breasts and cut them horizontally with a knife to form cutlets. Tenderize them by pounding them with a meat tenderizer until you get an even thickness of a quarter to one third of an inch. This makes the chicken thin enough for shallow frying as well as improving its texture. (Note 4)
- Mix the flour, paprika, onion powder, garlic powder, mustard powder, white pepper and salt in a bowl.
- Crack the egg into another bowl and beat.
- Place the panko breadcrumbs in a third bowl.
- Place each chicken breast into the flour until coated, then dunk them in the beaten egg and finally place them in the panko breadcrumbs until they are covered.
Pan frying the chicken
- Place a frying pan on a high heat and fill with ¼ inch of oil. Add one breadcrumb to check the oil is hot. If it sizzles and quickly burns up you are good to go, but if it sinks you need to wait a little longer for the oil to become hot.
- Place the panko-coated chicken breasts into the pan and fry for 1.5 to 2 minutes on each side. (Note 5)
Baking method
- Place the chicken breasts on a wire rack over a baking sheet. Bake in a preheated 400°F (200°C) oven for 12-15 minutes or until internal temperature reaches 165°F (74°C).
- Place the chicken breasts onto a wire rack and allow them to rest for a few minutes. (Note 6)
- Slice and serve immediately with lemon wedges and your desired sides.
Notes
- Chicken: You can use breast or boneless skinless chicken thighs, but I always opt for breast. Frying adds fat, so I like to start with a lean cut of meat.
- Panko breadcrumbs: These should be available in your local store. You can also use regular breadcrumbs, but the chicken won't be as crispy.
- Oil: Use a neutral oil with a high burn point like vegetable or sunflower oil. Do not use olive oil.
- Tenderizing the chicken: If you do not have a meat tenderizer you can use a rolling pin instead. Put the chicken into a plastic bag first to avoid contamination.
- Frying the chicken: You might need to fry the chicken in batches depending on the size of your pan and you may also need to top up the oil as you go.
- Checking doneness: Cut into one piece with a sharp knife to check the meat is white. If it is red it is not done and will need to go back into the pan. You can also use a meat thermometer to check the temperature. Cooked chicken should be 165F or 75C.
Wow, this is my favorite family recipe. I love how quickly the chicken cooks, our kids love it. It's such an easy mid-week meal to cook.
Thanks Becca, so glad you enjoyed it!
I made this tonight and it was absolutely crispy and delicious. Your recipe and directions were clear and precise and that’s why they turned out so amazingly! I made a fresh salad as a side and the meal is now going to be my new signature “go to” meal. Thank you thank you! 🙌
From Jenny on the Cape
I am inexperienced in frying chicken, and in using Panko. I made this recipe for dinner tonight and my elderly parents (who have various dietary limitations), husband, and I loved it. My husband doesn't really care for chicken dishes, but said this was the best he'd ever had, and is looking forward to eating it, again. I especially liked your easy-to-follow instructions and tips. Thanks for the great recipe!
Hi Martha, thank you so much for the lovely comment. It makes me very happy to hear how much you and your family enjoyed this recipe.
Absolutely delicious. First time I've managed to get the panko crumbs just right thanks to your advice. Thank you!
That's so great to hear. Thank you for letting me know.
This was a very simple and easy recipe. I cooked each side for a little over 2 minutes because I was worried about undercooking the chicken. They were delicious. I may try 2 minutes next time. I was shocked that they could cook so quickly, but after pounding thinly, they cooked easily.
I'm really happy to hear that, Sandi. Thank you for letting me know. 🙂
I made this chicken tonight and it turned out perfect! This is my perfect chicken recipe now!
This recipe was nice quick and easy but it should specify the thickness of the chicken when pounding it. We're bot pounding it just for tenderness and if you skip to the recipe like I did, you don't see the pictures of them being extremely thin. Mine weren't thick but definitely thicker than the picture, which did not cook in the pan. I have to finish them in the oven which is probably going to lead me to scraping off the breading.
Hi Desia, thank you for the comment. I'm very sorry to hear the chicken didn't turn out well. Tenderising is an important step both for improving the texture of the chicken and making it thin enough for shallow frying. I have amended step one in the recipe to ensure this is clear.
Turned our delicious! Thanks for sharing the recipe 🙂
Thanks for commenting, Sabrina. I'm really happy to hear that.
This looks delicious! What do you do with the spices after mixing them together?
Hi Bethany, great to hear you are interested in this recipe. The spices are mixed with the flour. The chicken is coated in the spicy flour, then egg and finally breadcrumbs before frying.